18 Dec 2013
by sunhealersblog
in Crafts & Activities
Tags: Christmas, Christmas ball decorations, Christmas ball ornaments, Christmas decoration, Christmas ornament, Christmas present, decoration, DIY, DIY holiday, Do it yourself, Holiday, ornament, present, present decoration


So here is the inspiration behind this one… The other day we went to the mall and saw the most simple yet captivating Christmas decoration on display. It was a clear plastic box with these beautiful Christmas ball ornaments inside. It was wrapped like a present with red ribbons and a fancy bow on top. As we were making our descent down the escalators we saw it and immediately praised it’s simplistic yet captivating look. We both declared how we would both like to have one for the house.
Then the other night I had an idea… We just so happened to have this big clear box from the tree ornaments that we got this year. We also just so happened to have quite a few of Christmas ball ornaments left over this year. All I had left over was this one piece of red ribbon, even though I needed two for the width. Oh well, do what you can with what you got, right? “Perfect!” I thought and off to work I went. I had one red bow left, which I put on top. I used a green one to cover up the label on the corner, which would not peel off as easily as I expected. Not wanting to ruin the integrity of the box by the label I decided to cover it up instead. I put it on the table outside in the patio. It was the only place I could leave it and know that a certain 2 year old wouldn’t destroy it wanting to play with the balls.

14 Dec 2013
by sunhealersblog
in Crafts & Activities
Tags: Christmas, Christmas ball decorations, Christmas ball ornaments, Christmas decoration, Christmas tree decorations, Christmas tree ornaments, decoration, DIY, DIY Christmas, Do it yourself, Holiday, holiday DIY

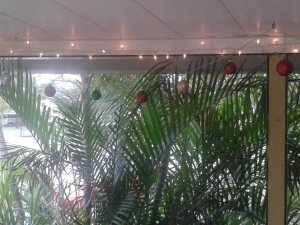

We happened to have an excess of left over Christmas decorations this year. One afternoon under spontaneous inspiration I decide to get crafty with the materials that I already had around the house. I took my good ol’ ball of yarn and strung it on these rings that we have going across one end of the patio ceiling. I then hung the Christmas ball ornaments up with the left over hooks. It ended up complimenting the rest of the decorations very well. We have been getting ready for our Winter Solstice Celebration and have been in some mood to fancy up the house spreading the holiday cheer. I must say it is very rewarding to go with the flow and enjoy yourself, whichever way it so happens to be for you.
06 Dec 2013
by sunhealersblog
in Crafts & Activities
Awesome DIY Christmas decoration
 Los Dos Aiko's

Ok, here’s the deal: I have way too much rosemary on my hands. I have a tree (ahem, plant) that is 5 feet tall, and I don’t know what to do with it all. Sure it’s fabulous for cooking and it smells glorious, but most days I’m not sure how best to make use of it…and there’s LOTS of it. Here’s the second part: I already told myself I wouldn’t spend money on decorations this year. It just seems like we have SO much already. So over the weekend, I pulled out my faithful red berry Martha Stewart wreath to hang on the front door, but somehow it felt lack-luster (no offense, Martha). Cue Giant Rosemary Plant to the rescue!! The poor guy sits on the side of my house all year long waiting for his season of glory. I went out and trimmed several limbs from his trunk and…
View original post 296 more words
22 Nov 2013
by sunhealersblog
in Crafts & Activities
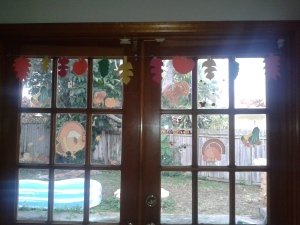
Tags: Autumn, Autumn garland, Autumn kid crafts, Autumn leaves, colorful leaves, construction paper, construction paper crafts, crafts, Fall, Fall garland, Fall leaves, garland, kid crafts, leaves, pumpkin, seasonal crafts, Thanksgiving, Thanksgiving garland, Thanksgiving kid crafts
What you’ll need:
- yarn or string
- tape
- scissors
- construction paper ( orange, green, yellow, orange, red)
- pencil
What to do:
- Draw and cut out different shapes of Fall leaves and pumpkins using the construction paper.
- Fold the stems over the string and tape them on.
19 Nov 2013
by sunhealersblog
in Crafts & Activities
Tags: construction paper, construction paper crafts, crafts, gratitude, gratitude tree, kid crafts, seasonal crafts, thankful, thankfulness, Thanksgiving, Thanksgiving crafts, tree

- yellow, brown, orange, red, green, purple construction paper
- glue
- pencil
- scissor
What to do:
- Trace and cut out your child’s hands on the orange, yellow, and red construction paper.
- Have the child write one thing that they are grateful for inside each hand.
- Glue together the purple and green construction paper to make a big sheet.
- Draw and cut out the trunk of the tree using the brown construction paper.
- Glue on the trunk to the large sheet.
- Glue on the hands on top of trunk as the leaves.
17 Nov 2013
by sunhealersblog
in Crafts & Activities
Tags: construction paper, crafts, hay, kid crafts, kid Thanksgiving crafts, scarecrow, seasonal crafts, Thanksgiving, Thanksgiving crafts


You will need:
- brown construction paper for bodies
- colored construction paper of all sorts
- hay
- markers
- scissors
- glue
What to do:
- Draw and cut out the scarecrow bodies.
- Draw and cut out the clothes for the scarecrows.
- Color and decorate the clothes in using the markers.
- Draw and cut out the shoes and the hat.
- Color them in and decorate.
- Glue on the clothes, shoes, and hat to the scarecrows bodies.
- Glue on a little bit of hay around the body. A strip on the arms, feet, neck, and forehead.
13 Nov 2013
by sunhealersblog
in Crafts & Activities
Tags: Autumn, Autumn Birthday card, Autumn leaves, birthday, birthday card, card, construction paper, construction paper crafts, DIY, DIY birthday card, Fall, Fall Birthday card, Fall leaves, leaves, pumpkin
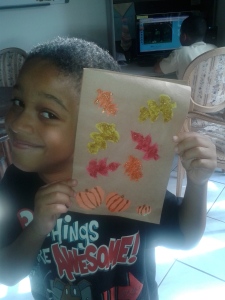
This was grandma’s birthday card this year. We drew and cut out different shapes of Fall leaves and pumpkins. We then used glitter pens to color in the leaves to make them more exciting. We used the green glitter pen to outline the pumpkins. The next day after they were all dried we glued them onto the folded brown piece of construction paper as the card.
10 Nov 2013
by sunhealersblog
in Crafts & Activities
Tags: construction paper, craft, crafts, DIY, DIY crafts, DIY Thanksgiving, kid crafts, pipe cleaner, seasonal craft, Thanksgiving, Thanksgiving crafts, turkey, turkey crafts
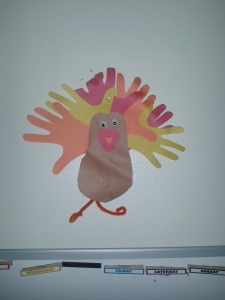
You will need:
- red, orange, yellow, brown construction paper
- crafts eyes
- orange pipe cleaner
- pencil
- scissor
- stapler
- glue
What to do:
- Trace your child’s hands using the orange, yellow, and orange construction paper.
- Trace your child’s feet using the brown construction paper.
- Cut out the hands and feet.
- Glue together the feet to make the turkey’s body.
- Glue the hands on the body from behind to make the feathers.
- Glue on the craft eyes to the body.
- Draw and cut out a mouth using the red construction paper.
- Draw a small triangle and cut out the beak using the orange construction paper.
- Cut the pipe cleaner in half.
- Staple the pipe cleaner to the body, as these will be the feet. Curl them a bit at the end.
27 Oct 2013
by sunhealersblog
in Crafts & Activities
Tags: construction paper, construction paper crafts, crafts, DIY, DIY crafts, DIY Halloween, Halloween, Halloween crafts, holiday decorations, homemade crafts, homemade Halloween decorations, kid crafts, kid Halloween crafts, paint, seasonal decorations, Spider
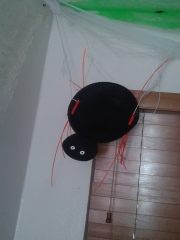
I painted 2 paper plates for each spider in black using paint. I then cut out a smaller circle as the head and glued on a pair of eyes. I used black and purple strips of construction paper as the legs for one spider and for the other used an orange weed chord that we had lying around in the garage. I used a hole puncher to make holes in the body and strung through cord that we had in the kitchen.

25 Oct 2013
by sunhealersblog
in Crafts & Activities
Tags: crafts, DIY, DIY Halloween, DIY Halloween crafts, Halloween, Halloween crafts, kid crafts, kid Halloween crafts, lantern, paper lantern, witch, witch's lantern
 D.I.Y. Halloween
There are many different types of lanterns one can make for Halloween. This is my interpretation of what a witch’s lantern would look like….Just for fun.

You will need:
- 1 black construction paper
- 1 purple construction paper
- 1 green construction paper
- orange and white paint
- craft eyes
- glue
- scissors
What to do:
- Take the black and purple construction paper and place it in front of you horizontally.
- Cut an inch strip vertically across from one of the sides on both sheets. The black strip will be the handle.
- Fold the paper in half, long ways. (like a hot dog, not a hamburger)
- Then cut lines, 1 centimeter wide, an inch apart from the middle where it’s folded, leaving an inch border at the end of the paper on both sides not cut. (Do not cut all the way through.)
- Glue the papers together at the borders.
- Roll the paper…
View original post 97 more words
Previous Older Entries Next Newer Entries


